All Categories
Featured
Table of Contents
- – Rv Awning Repair Near Me Santa Ana, CA
- – OCRV Center
- – Rv Fridge Repair Near Me Santa Ana, CA
- – Rv Electrical Repair Near Me Santa Ana, CA
- – Awning Repair Rv Santa Ana, CA
- – Local Rv Repair Santa Ana, CA
- – Rv Repair Reviews Santa Ana, CA
- – Rv Ac Repair Near Me Santa Ana, CA
- – Local Rv Repair Santa Ana, CA
- – Rv Ac Repair Near Me Santa Ana, CA
- – Repair Rv Awning Santa Ana, CA
- – Rv Awning Fabric Repair Santa Ana, CA
- – Rv Awning Fabric Repair Santa Ana, CA
- – The Rv Repair Centre Santa Ana, CA
- – OCRV Center
Rv Awning Repair Near Me Santa Ana, CA
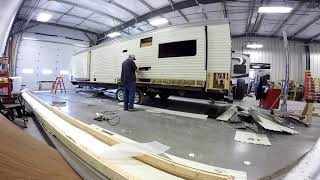
Both the interior and outside have actually to be kept congruously. With a strong exterior, you can add some longevity period to your car. Quality based flooring, wall surfaces, and siding are a must. So, it is extremely crucial that you pick the right and a top quality material in the production of your house siding.
Being relatively budget friendly and pocket-friendly, light weight aluminum house siding features a low maintenance too. It is rather easy to fix and is very durable. After repainting the aluminum house siding, it showcases a rather premium vibe for your entertainment vehicle. The light weight aluminum exterior siding has actually been among the oldest and most dependable systems of perpetuity.
Rv Fridge Repair Near Me Santa Ana, CA
The light weight aluminum siding for a motor home arrives with an exact fit and comprises of modern high-strength product. It has a high tolerance and precise joints. This sort of exterior siding is incredibly strong and can stand up to thousands of extra pounds efficiently. This light weight aluminum siding system meets a variety of requirements and style requirements.
We provide special order recreational vehicle light weight aluminum home siding with a number of modification choices. To be suitable for the visual top quality, there are a variety of color options available to make your entertainment vehicle choose the pattern. There are alternatives available in the pattern and design also, including 3" Mesa, 4" Mesa, 4" Mesa 1 with Opposite, Yoder and far more.
I'm gon na take all of this off. I wan na look below there, see what motivated somebody to place that on in the initial place, and after that just double check to make sure there aren't any still existing conditions under there that require to be dealt with.
Right here we go. I've obtained all the screws out, there were concerning a bazillion of them. And currently I'm dealing with this caulk, and the lesson out of this is slice don't pry. I am doing the deal with a level bar, but the trick to this is to use it like that, to slice the caulk complimentary.
Rv Electrical Repair Near Me Santa Ana, CA
You do not want anything sharp going versus that aluminum skin 'cause there's a possibility you can permeate it and you're gon na create a bigger issue. So I need to just maintain working my means up. And obviously, on both sides. Get in there. There you go. And as soon as I've obtained that caulk sliced, after that I'll have the ability to take this edge off and we'll see what's under there.
I've obtained this peeled to a point where this is all set to come off and look at inside there. It's gon na take a little exploration possibly from inside in order to figure out exactly how to deal with this upper corner.
Bear in mind, inside here, all of this flooring obtained replaced, and what I concerned find out is that that was the trouble. At one point, the camper had a leak can be found in with there. Someone attempted to do some repairs, yet the lower line is I need to open this up in order to get that element fixed.
Awning Repair Rv Santa Ana, CA
One, I have actually marked on the wall where I wan na make cuts in order to open this corner. And at this stage of the video game, this is sort of like exploratory surgical procedure. I wan na essentially do just possible first simply to see what's going on below. And then, if I require to open up the wall surface some much more, I will, but I would instead refrain from doing that.
I noted that as a straight line due to the fact that I'm gon na cut it straight as I can and that's gon na make it less complicated to spot back in. If you just enter below with a jigsaw or a Sawzall or something and suffice willy-nilly, after that I believe it's gon na make it more difficult to get new panels placed back right into this.
I'm gon na do as much of the cutting as I can with this tool. It's a cordless saw and it enables me to establish the deepness to cut so I know I'm gon na just hardly penetrate that paneling. To ensure that's excellent. That's gon na quit me from cutting stuff I do not wan na reduce beyond of the wall surface.
Local Rv Repair Santa Ana, CA
We don't understand what we're gon na obtain at inside there. At this stage of the game, we can fire points up and, I do not understand, start opening it up and see what's obtained ta take place next.
It's truly wonderful to see that this framework here is still really strong. To make it a little bit much easier to obtain to this and likewise simply to get rid of this item, I'm gon na cut this panel back a little bit a lot more.
Rv Repair Reviews Santa Ana, CA
I'm gon na cut back a little bit, and a little and a little bit, basically, I'm searching for the element where this obtains strong again similar to when I did the floor, it coincided idea of, how far back do we have to take it to get to good things? So I'm gon na mess with that.
That extra cut, bringing this back, obtained me to where I discovered wood that's strong, to make sure that's amazing. And among the important things that's intriguing out of this is, honestly, the framing of these trailers is actually very easy. A great deal of two by twos, two by threes. There's not a great deal of complex things going on below.
Rv Ac Repair Near Me Santa Ana, CA

So the lower line out of this is anything that looks hinky will appear of below and after that come back and restore this with brand-new framing things that'll let this corner go back together sturdily. Rv Awning Fabric Repair Santa Ana. Currently, when you do this, if you make use of a multi-toll, whatever you make use of to make these cuts you wan na be really careful
So you're just gon na need to be extremely, very cautious as you go with to make certain you don't go through. Go through the product, not experience the panel on the camper. I prepare to cut this one and what I've done is used a square to mark that line.
Local Rv Repair Santa Ana, CA
To make sure that functioned out actually well and got that flush cut. It's ready to obtain a new cross member in there and I'm gon na repeat that procedure and simply, like I claimed, get all the old scrap out of here. The rebuild on the edge here is going truly well and second best regarding the lumber here.
You could alternatively just purchase 2 by two also. And, as I put every little thing with each other, as I have actually pointed out previously, among the things I'm doing since I can not obtain to the outside to bring screws from the outdoors in throughout grain of this item, or here, I couldn't enter this means, so rather it's the corner irons that are making this job to make sure that I can tie every little thing with each other.
Rv Ac Repair Near Me Santa Ana, CA
This chunk of 2 by 6 lives right below and what it really does, is on the outside, this is the lower end of the support that stands up the front awning. So this item's function in life is to live right below and receive the screws on that support.
Screws I'm using are simply conventional inch and 5/8 wood screws and driving those with the cost chauffeur. The effect wrench, influence driver, makes a really large offer on that particular and it makes things go a lot much faster. So, from here on out, it's rinse and repeat, any type of other location that are blocks such as this, placed those in.
With the repair services done on the inside we're almost to a point where we can get brand-new trim outside of the camper, yet, prior to we can put new stuff on we got ta obtain old stuff off. There is a great deal of residue right here that's remaining from the trim that got on there.
Repair Rv Awning Santa Ana, CA
Obtaining old caulk off, especially motor home caulk, is hard to do, yet, I've obtained an approach for this using a multi-tool that makes this pretty simple, quite basic. So first of all, allow's have a look at the multi-tool and what we require, that suggestion, not a cutter, however what sort of idea we need in that multi-tool to work with this.
You have actually seen me use the multi-tool in other areas on the camper, cutting wood out, cutting nails. Now, in this situation, we don't wan na reduce with it we wan na push with it.
Rv Awning Fabric Repair Santa Ana, CA
So think of, if you can get a putty knife, if you did obtain a putty knife up against that caulk and you were pressing versus it, however like a billions times a min, that's what we're gon na make with this. So, wherefore we're doing, we do not desire a saw blade on below.
What I'm gon na do is start by knocking the teeth off. After that I'm gon na make this somewhat convex, and afterwards I'm gon na sharpen it simply a little, it does not have to be a knife edge, but simply envision what the suggestion of a putty knife looks like. That's all we want this to appear like when we're done.
Currently we can go after that caulk. Rv Awning Fabric Repair Santa Ana. Currently that we have the best tool for the work, we can start going after this caulk and component of the trick to this is when you come in with a multi-tool, this is tougher than the aluminum. Don't come in at an actual steep angle.
Rv Awning Fabric Repair Santa Ana, CA
And it's simply gon na be a matter of finding the best angle, finding the appropriate angle, and then slicing, cutting, slicing, up until you get all of that deposit off of there such as this. Well, there you go, you understand, and for me, there's whole lots more of this to do, so luckily, thank goodness it's as easy as it is with the multi-tool.

Make certain that the device is not gon na damage the substratum when you're functioning on obtaining this caulk off right here. I just got ta obtain back to it and got this entire corner to go.
Now, again, like I've discussed in the past, prior to you do this, make certain that whatever area you're tidying up can stand up to the roughness of a cord wheel being run over it. It works terrific on this light weight aluminum skin. Would not be a terrific option for any kind of a membrane layer, however basically we simply wan na scrub below and it's gon na rip off this junk that didn't come off from the previous action, such as this.
The Rv Repair Centre Santa Ana, CA
Actually what we wan na do here is make certain that if you're using this maintain it moving like that. Do not simply float in one spot 'cause we can obtain friction from this and we don't wan na burn the paint that's left on here. I've obtained ta an item of trim and it's ready, yet we're not actually setting up the trim at this factor.
OCRV Center
Address: 23281 La Palma Ave Yorba Linda, CA 92887Phone: (714) 909-1444
Email: art@ocrvcenter.com
OCRV Center
I'm gon na create the corner and then take it back off and we obtained ta get into an entire caulking step below. I'm gon na obtain this in area like that.
The Rv Repair Centre Santa Ana, CARv Repair Near Me Santa Ana, CA
Rv Blinds Repair Santa Ana, CA
Rv Aluminum Siding Repair Santa Ana, CA
Rv Awning Repair Santa Ana, CA
Rv Awning Fabric Repair Santa Ana, CA
Rv Ac Repair Near Me Santa Ana, CA
Rv Furnace Troubleshooting Santa Ana, CA
Motorhome Mechanic Near Me Santa Ana, CA
Motorhome Repair Shops Near Me Santa Ana, CA
Rv Specialists Santa Ana, CA
Recreational Vehicle Repair Santa Ana, CA
Rv Repair Near Me Santa Ana, CA
Repair Rv Awning Santa Ana, CA
Rv Repair Near Me Santa Ana, CA
Rv Ac Repair Near Me Santa Ana, CA
Rv Fridge Repair Near Me Santa Ana, CA
Rv Electrical Repair Near Me Santa Ana, CA
Rv Specialists Santa Ana, CA
Rv Electrical Repair Santa Ana, CA
Rv Repair Shop Santa Ana, CA
Motorhome Roof Repair Santa Ana, CA
Rv Furnace Repair Santa Ana, CA
Recreational Vehicle Repair Santa Ana, CA
Repair Rv Awning Santa Ana, CA
Rv Repair Near Me Santa Ana, CA
Motorhome Repair Shops Near Me Santa Ana, CA
Rv Blinds Repair Santa Ana, CA
Motorhome Roof Repair Santa Ana, CA
Repair Rv Awning Santa Ana, CA
Local Rv Repair Santa Ana, CA
Rv Aluminum Siding Repair Santa Ana, CA
Motorhome Repair Shops Near Me Santa Ana, CA
Rv Aluminum Siding Repair Santa Ana, CA
Rv Electrical Repair Near Me Santa Ana, CA
Rv Electrical Repair Santa Ana, CA
Rv Awning Repair Santa Ana, CA
Awning Repair Rv Santa Ana, CA
Rv Furnace Repair Near Me Santa Ana, CA
Rv Aluminum Siding Repair Santa Ana, CA
Motorhome Repairs Santa Ana, CA
Rv Electrical Repair Near Me Santa Ana, CA
The Rv Repair Centre Santa Ana, CA
Motorhome Mechanic Near Me Santa Ana, CA
Rv Furnace Troubleshooting Santa Ana, CA
Rv Awning Repair Near Me Santa Ana, CA
Rv Specialists Santa Ana, CA
Motorhome Roof Repair Santa Ana, CA
Rv Repair Reviews Santa Ana, CA
The Rv Repair Centre Santa Ana, CA
Rv Furnace Repair Near Me Santa Ana, CA
Rv Furnace Repair Near Me Santa Ana, CA
Rv Refrigerator Repair Santa Ana, CA
Rv Water Damage Repair Santa Ana, CA
Rv Refrigeration Repair Santa Ana, CA
Replacement Rv Awning Santa Ana, CA
Rv Furnace Repair Near Me Santa Ana, CA
Rv Repair Shop Santa Ana, CA
Rv Electrical Repair Santa Ana, CA
Awning Repair Rv Santa Ana, CA
Rv Awning Repair Near Me Santa Ana, CA
Rv Awning Fabric Repair Santa Ana, CA
Rv Furnace Troubleshooting Santa Ana, CA
Rv Ac Repair Near Me Santa Ana, CA
Motorhome Repairs Santa Ana, CA
Recreational Vehicle Repair Santa Ana, CA
The Rv Repair Centre Santa Ana, CA
Rv Furnace Repair Santa Ana, CA
Motorhome Mechanic Near Me Santa Ana, CA
Repair Rv Awning Santa Ana, CA
Rv Electrical Repair Near Me Santa Ana, CA
Rv Fridge Repair Near Me Santa Ana, CA
Rv Fridge Repair Near Me Santa Ana, CA
Motorhome Mechanic Near Me Santa Ana, CA
Repair Rv Awning Santa Ana, CA
Rv Electrical Repair Near Me Santa Ana, CA
Rv Refrigerator Repair Santa Ana, CA
Recreational Vehicle Repair Santa Ana, CA
Close By Seo Citations Santa Ana, CA
Finding A Good Local Seo Management Santa Ana, CA
Rv Awning Fabric Repair Santa Ana, CA
OCRV Center
Table of Contents
- – Rv Awning Repair Near Me Santa Ana, CA
- – OCRV Center
- – Rv Fridge Repair Near Me Santa Ana, CA
- – Rv Electrical Repair Near Me Santa Ana, CA
- – Awning Repair Rv Santa Ana, CA
- – Local Rv Repair Santa Ana, CA
- – Rv Repair Reviews Santa Ana, CA
- – Rv Ac Repair Near Me Santa Ana, CA
- – Local Rv Repair Santa Ana, CA
- – Rv Ac Repair Near Me Santa Ana, CA
- – Repair Rv Awning Santa Ana, CA
- – Rv Awning Fabric Repair Santa Ana, CA
- – Rv Awning Fabric Repair Santa Ana, CA
- – The Rv Repair Centre Santa Ana, CA
- – OCRV Center
Latest Posts
Furnace Installation Sherman Oaks
Air Conditioning Repair Contractor South Pasadena
Air Conditioning Replacement Alhambra
More
Latest Posts
Furnace Installation Sherman Oaks
Air Conditioning Repair Contractor South Pasadena
Air Conditioning Replacement Alhambra