All Categories
Featured
Table of Contents
- – Rv Slide Out Roof Repair Irvine, CA
- – OCRV Center
- – Rv Roof Repair Fiberglass Irvine, CA
- – Rv Rubber Roof Maintenance Irvine, CA
- – Rv Roof Repair Fiberglass Irvine, CA
- – Motorhome Roof Replacement Irvine, CA
- – Rv Trailer Rubber Roof Repair Irvine, CA
- – Rv Rubber Roof Replacement Cost Irvine, CA
- – Rv Roof Repair Fiberglass Irvine, CA
- – Rv Fiberglass Roof Repair Irvine, CA
- – Replace Rv Roof Irvine, CA
- – Rubber Roof Installation Irvine, CA
- – Replace Rv Roof Irvine, CA
- – Repair Rv Roof Irvine, CA
- – OCRV Center
Rv Slide Out Roof Repair Irvine, CA
Wipe it dry and after that permit the surface area to dry in the sunlight before applying the tape per the guidelines. When you apply the tape, make sure to push each item down completely, eliminating any kind of air bubbles and forcing the tape down completely to the surface area in any reduced spots.
The lifespan of motor home roofs differs extensively depending on top quality, material, and the level of maintenance they have gotten. 10 to twenty years is a sensible quote for the entire lifespan of a roofing. If you think you might need a new roof, I suggest obtaining it checked and priced by a specialist before trying to deal with massive leakages on your very own.
Rv Roof Repair Fiberglass Irvine, CA
And then all of your time, initiative, and prices can be wasted if it's time for a new roofing. Roofing system leakages are one of the great common of Motor home life.
In that instance, you might desire to take a look at these relevant guides: Our solutions to often asked inquiries about fixing RV roofing leakages: Do not hesitate. Leaks just obtain even worse and much more expensive to deal with over time.
are considered by many to be the best item for the majority of applications. There are comparable items readily available. It relies on the sealer you use. Many products are designed to heal the fastest around "area temperature," which is usually around 60 or 70 levels. Check the guidelines on the sealer of your selection to validate.
Rv Rubber Roof Maintenance Irvine, CA
Some RVers like them, while others encourage versus them. I've utilized Flex Seal products for quick, short-lived repair services to our motor home's wall surfaces, and they worked well. My only complaint is that they are difficult to get rid of. It relies on your policy terms and what caused the roof covering leak. If the leakage was triggered by a sudden and unexpected event, such as a tree arm or leg falling throughout a tornado, I would expect that most insurance plan would certainly cover it.
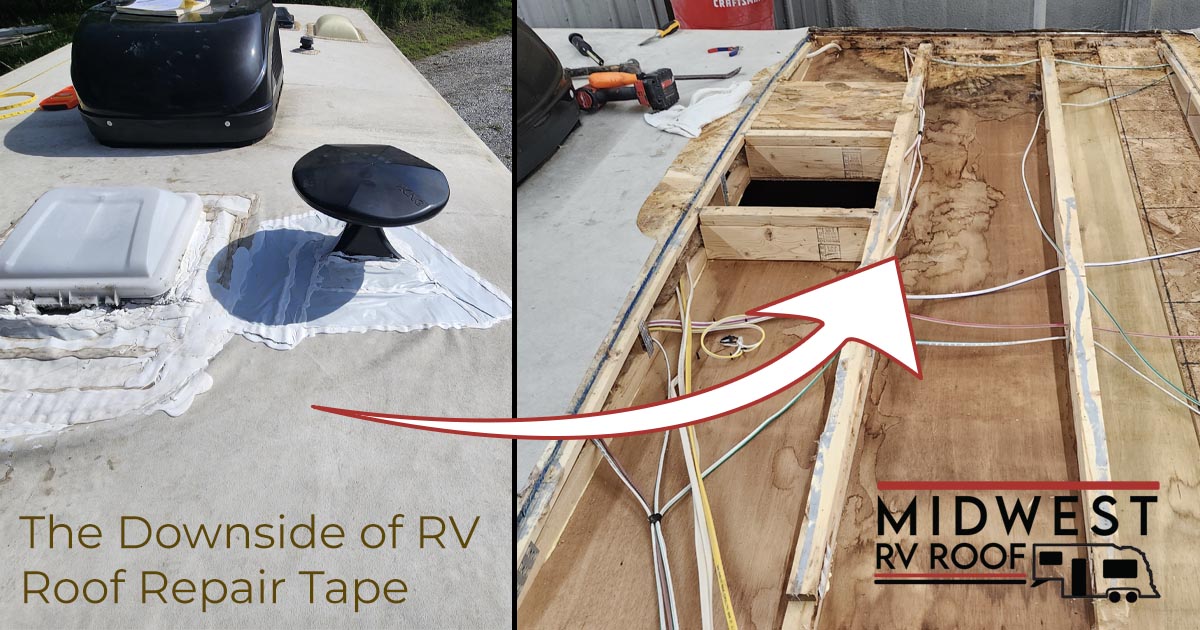
Below are some photos of a task I did to repair roofing system rot on my fifth wheel camper. I picked to use this technique since I could do it myself with my very own resources and skills. Or else, a great deal of hardware, including the ladder and roofing rack, the endcap and the filon external wall would certainly have needed to be torn apart.
As a matter of fact, I favor it this means considering that I recognize exactly how the repair was done. Plus, I would certainly have had to acquire it out, possibly costing me hundreds of dollars. I used products from The Rot Doctor. I have no association with the company. They were really practical in discussing my alternatives and in discussing the methods to used their products.

I made use of a box knife to cut the rubber roof in the corner. It possibly leaked from the time the unit was new, as the roofing was really soft in this edge, and we've been in dry spell problems for 2 years.
Rv Roof Repair Fiberglass Irvine, CA
Folding back the rubber revealed the rotten area. I reduced a piece of plywood like a challenge to match the shape of the opening I made in the roofing.
Below's the sprayer I used to apply the CPES * from The Rot Medical professional. With its 18 metal "stick" I might penetrate right into the 2 space in between the roofing and the ceiling.
6. Right here's the finished roofing sealed up with Eternabond tape. I ran a strip of Eternabond completely throughout the camper where the roofing satisfies the endcap. Any concerns of a leak right here are a distant memory. 7. I likewise had rot in the wall straight below the area on the roofing.
I extensively dried out the area for numerous days using the exhaust side of a small vacuum cleaner, inserting the hose pipe between the inner and external wall surfaces. When it was completely dry I covered everything with CPES *, making use of the bug sprayer to penetrate into otherwise hard to reach areas.
Motorhome Roof Replacement Irvine, CA
Note the top 3-4 of the stud was totally decomposed away. I spread Fill-It Epoxy Filler * throughout the area. The things goes on like a thick and sticky gel, then dries out to a very tough material that bonds to the CPES * I had splashed onto the wood.
Here's the ended up product. Total cost was concerning $200.00 plus numerous hours of my time. * These products are inaccessible, we are selling equivalent products that will carry out these exact same jobs. Do not hesitate to call us if you require support with which items to use.
In this overview, we'll check out the prices, advantages, and options for sealing and repairing your motor home roof, assisting you make the most effective choice for your lorry. While some signs that your RV roofing system is harmed or leaking are noticeable, such as water streaming in throughout a rainstorm, various other signs of damage might not be as conveniently noticeable.
Rv Trailer Rubber Roof Repair Irvine, CA
If the structural honesty is still audio, securing and reinforcing it with Fluid Rubber products may be the smarter, more cost-effective service. When you understand your RV's roof covering kind, you should consider the expense of changing it. The price will certainly vary depending upon the size of the recreational vehicle, the kind of roofing system, and the materials used.
Along with the cost of the products, need to likewise be thought about. If you select to employ a for the task, after that you can anticipate to pay anywhere from for labor, relying on the size of the RV, the kind of roof and the intricacy of the work. If you select to do the task yourself, you can anticipate to pay only for the products and the financial investment of your DIY sweat equity.
Rv Rubber Roof Replacement Cost Irvine, CA
Do not wait up until your roof covering leaks obtain worse. The cost of securing your Motor home roofing system yourself greatly depends on the high quality of the sealer you select.
One application covers up to a 30' RECREATIONAL VEHICLE. Provided its simple application and considerable insurance coverage, the labor prices remain marginal, making it an appealing option for those looking to save on maintenance prices.
The expense of a complete motor home roofing substitute varies from $2,500 to $10,000. Repairing sections can set you back $300 to $2,000+, depending on the extent of the damages. A gallon of Liquid Rubber Motor Home Roofing Finishing is, and a full kit is. Routine upkeep can extend your roof's life expectancy and conserve considerable expenses, protecting against water intrusion.
Sealant gives low-cost roof defense, setting you back regarding per tube for area repair work. Total roof covering elimination and replacement. $2,500 - $10,000+ (materials and labor). Positive actions aim to delay or eliminate the requirement for full replacement significantly. As this contrast shows, proactive upkeep of your recreational vehicle roofing is significantly much more economical than handling the results of damages.
Rv Roof Repair Fiberglass Irvine, CA
There are numerous various sorts of RV roofing system substitute. One of the most common kind is a rubber roof covering. Rubber High Lightweight Inexpensive Low No Steel Very High Lightweight Expensive Low Yes Fiberglass High Heavy Moderate Reduced Yes Polymer Moderate Really Light Cost-effective Reduced No Each roofing system kind has benefits and disadvantages, so the very best selection relies on your particular requirements.
When you use Liquid Rubber Sealer products, adhere to the application instructions carefully. The guidelines will certainly indicate the length of time the product requires to treat so you can set up the application around your neighborhood weather condition patterns. Liquid Rubber recreational vehicle Roofing system Finishing stands apart for its easy application process. Its fluid kind makes sure total coverage of the whole roof covering.
There are many factors to routinely recoat your recreational vehicle roof, sealing it versus water damage, sunlight, wind, and deterioration. Like any electric motor automobile, RV roofings are constructed to withstand hard climate, from snow to hail to a deluge. However, the roof covering product can still wear in time - Rv Trailer Rubber Roof Repair Irvine.
Rv Fiberglass Roof Repair Irvine, CA
Resealing your Recreational vehicle roof covering is a manageable Do it yourself job if you take it step-by-step. Tidy the entire roof surface making use of a Motor home roofing cleaner and a scrub brush.
: Carefully get rid of any kind of failing or broken sealant around vents, skylights, and seams utilizing a plastic scraper or specialized sealant removal device. Be mindful not to harm the roofing material.: Utilizing a self-leveling sealant (particularly developed for motor home roofs), apply a charitable bead along all seams, around vents, skylights, and any type of other roof covering infiltrations.
: If you have fractures or damages, take into consideration using motor home roofing repair tape or a liquid rubber finish, following the item guidelines carefully.: Once the sealant has cured (check item guidelines for curing time), examine the whole roofing system to make certain all locations are appropriately sealed.: Constantly get in touch with the specific instructions for your sealant and repair items.
Even little leakages can create:: Rotting wood, weakening of the roof covering framework, and damages to walls and ceilings.: This produces unhealthy living conditions and harms the RV's interior.: Decreasing the performance of your motor home's insulation.: Resolving water damages is substantially much more expensive than preventative maintenance like routine evaluations and resealing.
Replace Rv Roof Irvine, CA
To establish whether your motor home roof is made from EPDM or TPO, adhere to these steps:: Discover a roof covering air vent on your RV.: Unscrew and remove the trim ring to expose a section of the roofing material.: If feasible, get rid of a staple from the roofing material and take a look at both sides: If one side is white or dove grey with a black support, it is likely EPDM.
The main difference in between RV roofing sealer and layer is their function and application.: This is typically made use of to load gaps, seams, and splits in the roof material. It supplies a water-proof obstacle to stop leakages and is usually used in certain locations, such as around vents, joints, and various other infiltrations.

: This is a safety layer that covers the whole roofing system surface area. Coatings are generally related to boost UV resistance, reflectivity, and overall roof covering toughness. They can assist prolong the life of the roof material by supplying an extra barrier versus weather condition elements. Both products are important for maintaining a recreational vehicle roof covering yet offer unique functions, ensuring its longevity and performance.
Rubber Roof Installation Irvine, CA
CLEAN, CLEAN CLEAN the roof prior to applying the finish. Did I point out Cleaning up the roofing? Best of luck.
CLEAN, CLEAN CLEAN the roofing prior to using the finishing. Did I state Cleansing the roof covering? Excellent Good luck.
In this article, we wish to show to you exactly how to do it yourself RV roofing system repair work. Living in a recreational vehicle has outstanding moments, yet things also fail. Recognizing how to DIY a great deal of things that can damage or ruin will certainly save you not just a great deal of money on recreational vehicle repair services yet could additionally save you a whole lot of prospective time in the store! This post may contain affiliate links.
I might get a tiny payment when you make an acquisition utilizing my web link. We try to plan our paths thoroughly to prevent low-hanging objects over the road. This is exactly how we finished up with a couple of small tears on the roofing system of our Motor home.
Replace Rv Roof Irvine, CA
We believed we were clear of the branches, but we finished up capturing a few of them on the much left side of the roof covering. There were an overall of 4-5 tiny holes in the side of the roofing system. We didn't examine the roof since we didn't assume we hit anything.
One of the rips in our motor home roofing system A few weeks later on, we sustained an extreme thunderstorm and a great deal of rainfall. Throughout the storm, we discovered that we had a percentage of water leaking via one of the light components in the bathroom. The good news is, we did not wind up with any long-term water damage.
He covered it as best he could with durable gorilla tape and after that got the materials needed to do a recreational vehicle roof repair work. The EPDM rubber roof product that the majority of Motor homes come with is normally pretty hard as for roof materials go (Rv Trailer Rubber Roof Repair Irvine). Rubber roof coverings last for many years, but they do tear if captured hard enough
In our case, this meant eliminating the gorilla tape that we had actually made use of as a short-term solution while we waited on the products we ordered to get here. You'll intend to cleanse the location around the tear that you will be covering well. This permits the patch to appropriately adhere and will stop future leaks.
Repair Rv Roof Irvine, CA
OCRV Center
Address: 23281 La Palma Ave Yorba Linda, CA 92887Phone: (714) 909-1444
Email: art@ocrvcenter.com
OCRV Center
To cleanse the roofing, make use of massaging alcohol and either a cloth or paper towels. Tucker looked at the area 2-3 times to see to it it was cleansed truly well. Allow it dry completely before carrying on. Applying the Externabond tape After the area has actually completely dried out from cleaning, it's time to add the Eternabond tape, which is a motor home roof covering repair tape.
Motorhome Roof Replacement Irvine, CAReplace Rv Roof Irvine, CA
Rv Trailer Rubber Roof Repair Irvine, CA
Rv Roof Leak Repair Near Me Irvine, CA
Rubber Roof For Rv Irvine, CA
Motorhome Roof Replacement Irvine, CA
Rv Rubber Roof Replacement Irvine, CA
Rv Roof Maintenance Irvine, CA
Rubber Roofing For Rv Irvine, CA
Resealing Rv Roof Irvine, CA
Replace Rv Roof Irvine, CA
Rv Rubber Roof Maintenance Irvine, CA
Repair Rv Roof Leak Irvine, CA
Resealing Rv Roof Irvine, CA
Rv Rubber Roof Replacement Irvine, CA
Class C Rv Roof Repair Irvine, CA
Rv Roof Repair Fiberglass Irvine, CA
Rv Rubber Roof Repair Irvine, CA
Rv Roof Repair Near Me Irvine, CA
Resealing Rv Roof Irvine, CA
Rv Roof Repair Service Near Me Irvine, CA
Rv Roof Repair Service Near Me Irvine, CA
Roof Repair For Rv Irvine, CA
Rv Rubber Roof Replacement Cost Irvine, CA
Epdm Rv Roof Repair Irvine, CA
Repair Rv Roof Irvine, CA
Rubber Roof For Rv Irvine, CA
Class C Rv Roof Repair Irvine, CA
Rv Rubber Roof Maintenance Irvine, CA
Roof Repair For Rv Irvine, CA
Rv Roof Replacement Irvine, CA
Rubber Roofing For Rv Irvine, CA
Rv Rubber Roof Replacement Cost Irvine, CA
Rv Trailer Roof Repair Irvine, CA
Motorhome Roof Replacement Irvine, CA
Rv Rubber Roof Repair Irvine, CA
Rv Fiberglass Roof Repair Irvine, CA
Rubber Roof For Rv Irvine, CA
Resealing Rv Roof Irvine, CA
Rv Rubber Roof Replacement Irvine, CA
Rv Rubber Roof Maintenance Irvine, CA
Rv Roof Repair Fiberglass Irvine, CA
Rubber Roof For Rv Irvine, CA
Class C Rv Roof Repair Irvine, CA
Rubber Roofing For Rv Irvine, CA
Rubber Roof For Camper Irvine, CA
Resealing Rv Roof Irvine, CA
Rv Roof Leak Repair Near Me Irvine, CA
Rv Roof Repair Service Near Me Irvine, CA
Motorhome Roof Replacement Irvine, CA
Rv Trailer Rubber Roof Repair Irvine, CA
Roof Repair For Rv Irvine, CA
Rv Roof Leak Repair Near Me Irvine, CA
Epdm Rv Roof Repair Irvine, CA
Rv Trailer Roof Repair Irvine, CA
Motorhome Roof Replacement Irvine, CA
Class C Rv Roof Repair Irvine, CA
Best Rv Roof Repair Irvine, CA
Rv Rubber Roof Replacement Irvine, CA
Rv Roof Repair Fiberglass Irvine, CA
Rv Rubber Roof Maintenance Irvine, CA
Rv Fiberglass Roof Repair Irvine, CA
Rv Trailer Rubber Roof Repair Irvine, CA
Rv Rubber Roof Replacement Irvine, CA
Repair Rv Roof Leak Irvine, CA
Rubber Roofing For Campers Irvine, CA
Best Rv Roof Repair Irvine, CA
Rv Rubber Roof Replacement Cost Irvine, CA
Roof Repair For Rv Irvine, CA
Rv Rubber Roof Maintenance Irvine, CA
Rv Trailer Roof Repair Irvine, CA
Repair Rv Roof Leak Irvine, CA
Rubber Roofing For Campers Irvine, CA
Rv Fiberglass Roof Repair Irvine, CA
Rv Rubber Roof Maintenance Irvine, CA
Rubber Roofing For Rv Irvine, CA
Roof Repair For Rv Irvine, CA
Rv Fiberglass Roof Repair Irvine, CA
Companies Near Me Seo Expert Irvine, CA
Close To Seo Citations Irvine, CA
OCRV Center
Table of Contents
- – Rv Slide Out Roof Repair Irvine, CA
- – OCRV Center
- – Rv Roof Repair Fiberglass Irvine, CA
- – Rv Rubber Roof Maintenance Irvine, CA
- – Rv Roof Repair Fiberglass Irvine, CA
- – Motorhome Roof Replacement Irvine, CA
- – Rv Trailer Rubber Roof Repair Irvine, CA
- – Rv Rubber Roof Replacement Cost Irvine, CA
- – Rv Roof Repair Fiberglass Irvine, CA
- – Rv Fiberglass Roof Repair Irvine, CA
- – Replace Rv Roof Irvine, CA
- – Rubber Roof Installation Irvine, CA
- – Replace Rv Roof Irvine, CA
- – Repair Rv Roof Irvine, CA
- – OCRV Center
Latest Posts
Verdugo City Home Ac Repair
Garage Exhaust Fan South Pasadena
Exhaust Fan Repairs Near Me North Hills
More
Latest Posts
Verdugo City Home Ac Repair
Garage Exhaust Fan South Pasadena
Exhaust Fan Repairs Near Me North Hills