All Categories
Featured
Table of Contents
- – Rubber Roofing For Rv Atwood, CA
- – OCRV Center
- – Rv Rubber Roof Replacement Cost Atwood, CA
- – Repair Rv Roof Atwood, CA
- – Rv Fiberglass Roof Repair Atwood, CA
- – Rv Rubber Roof Replacement Cost Atwood, CA
- – Rv Roof Repair Fiberglass Atwood, CA
- – Rv Rubber Roof Repair Atwood, CA
- – Repair Rv Roof Atwood, CA
- – Rv Roof Leak Repair Atwood, CA
- – Rv Trailer Rubber Roof Repair Atwood, CA
- – Roof Repair For Rv Atwood, CA
- – Rv Roof Repair Service Near Me Atwood, CA
- – Replace Rv Roof Atwood, CA
- – OCRV Center
Rubber Roofing For Rv Atwood, CA
roofing a good scrub down with some power cleaning! This will guarantee that no dust or gunk remains on your R.V.'s roof covering which can cause the brand-new finishing to not adhere effectively. Prior to applying coatings it is necessary to remove any type of loose sealant around the R.V.'s vents and penetrations! If you don't do this after that applying new Recreational vehicle roof covering securing can be hard as there will already be a layer of R.V.
Tools you might utilize for this consist of paint scrappers chisels mills. You want to make sure you do not damage any sublayer of your Recreational vehicle roofing simply fire for removing the sealant and lose particles. If you have already gotten rid of the loosened R.V. sealer that's around vents and infiltrations, then it's time to make use of some recreational vehicle roof covering tape over these areas! Use Difficult Roofing Tape smoothly around all vents, skylights, infiltrations to seal out all wetness from going into.
Rv Rubber Roof Replacement Cost Atwood, CA
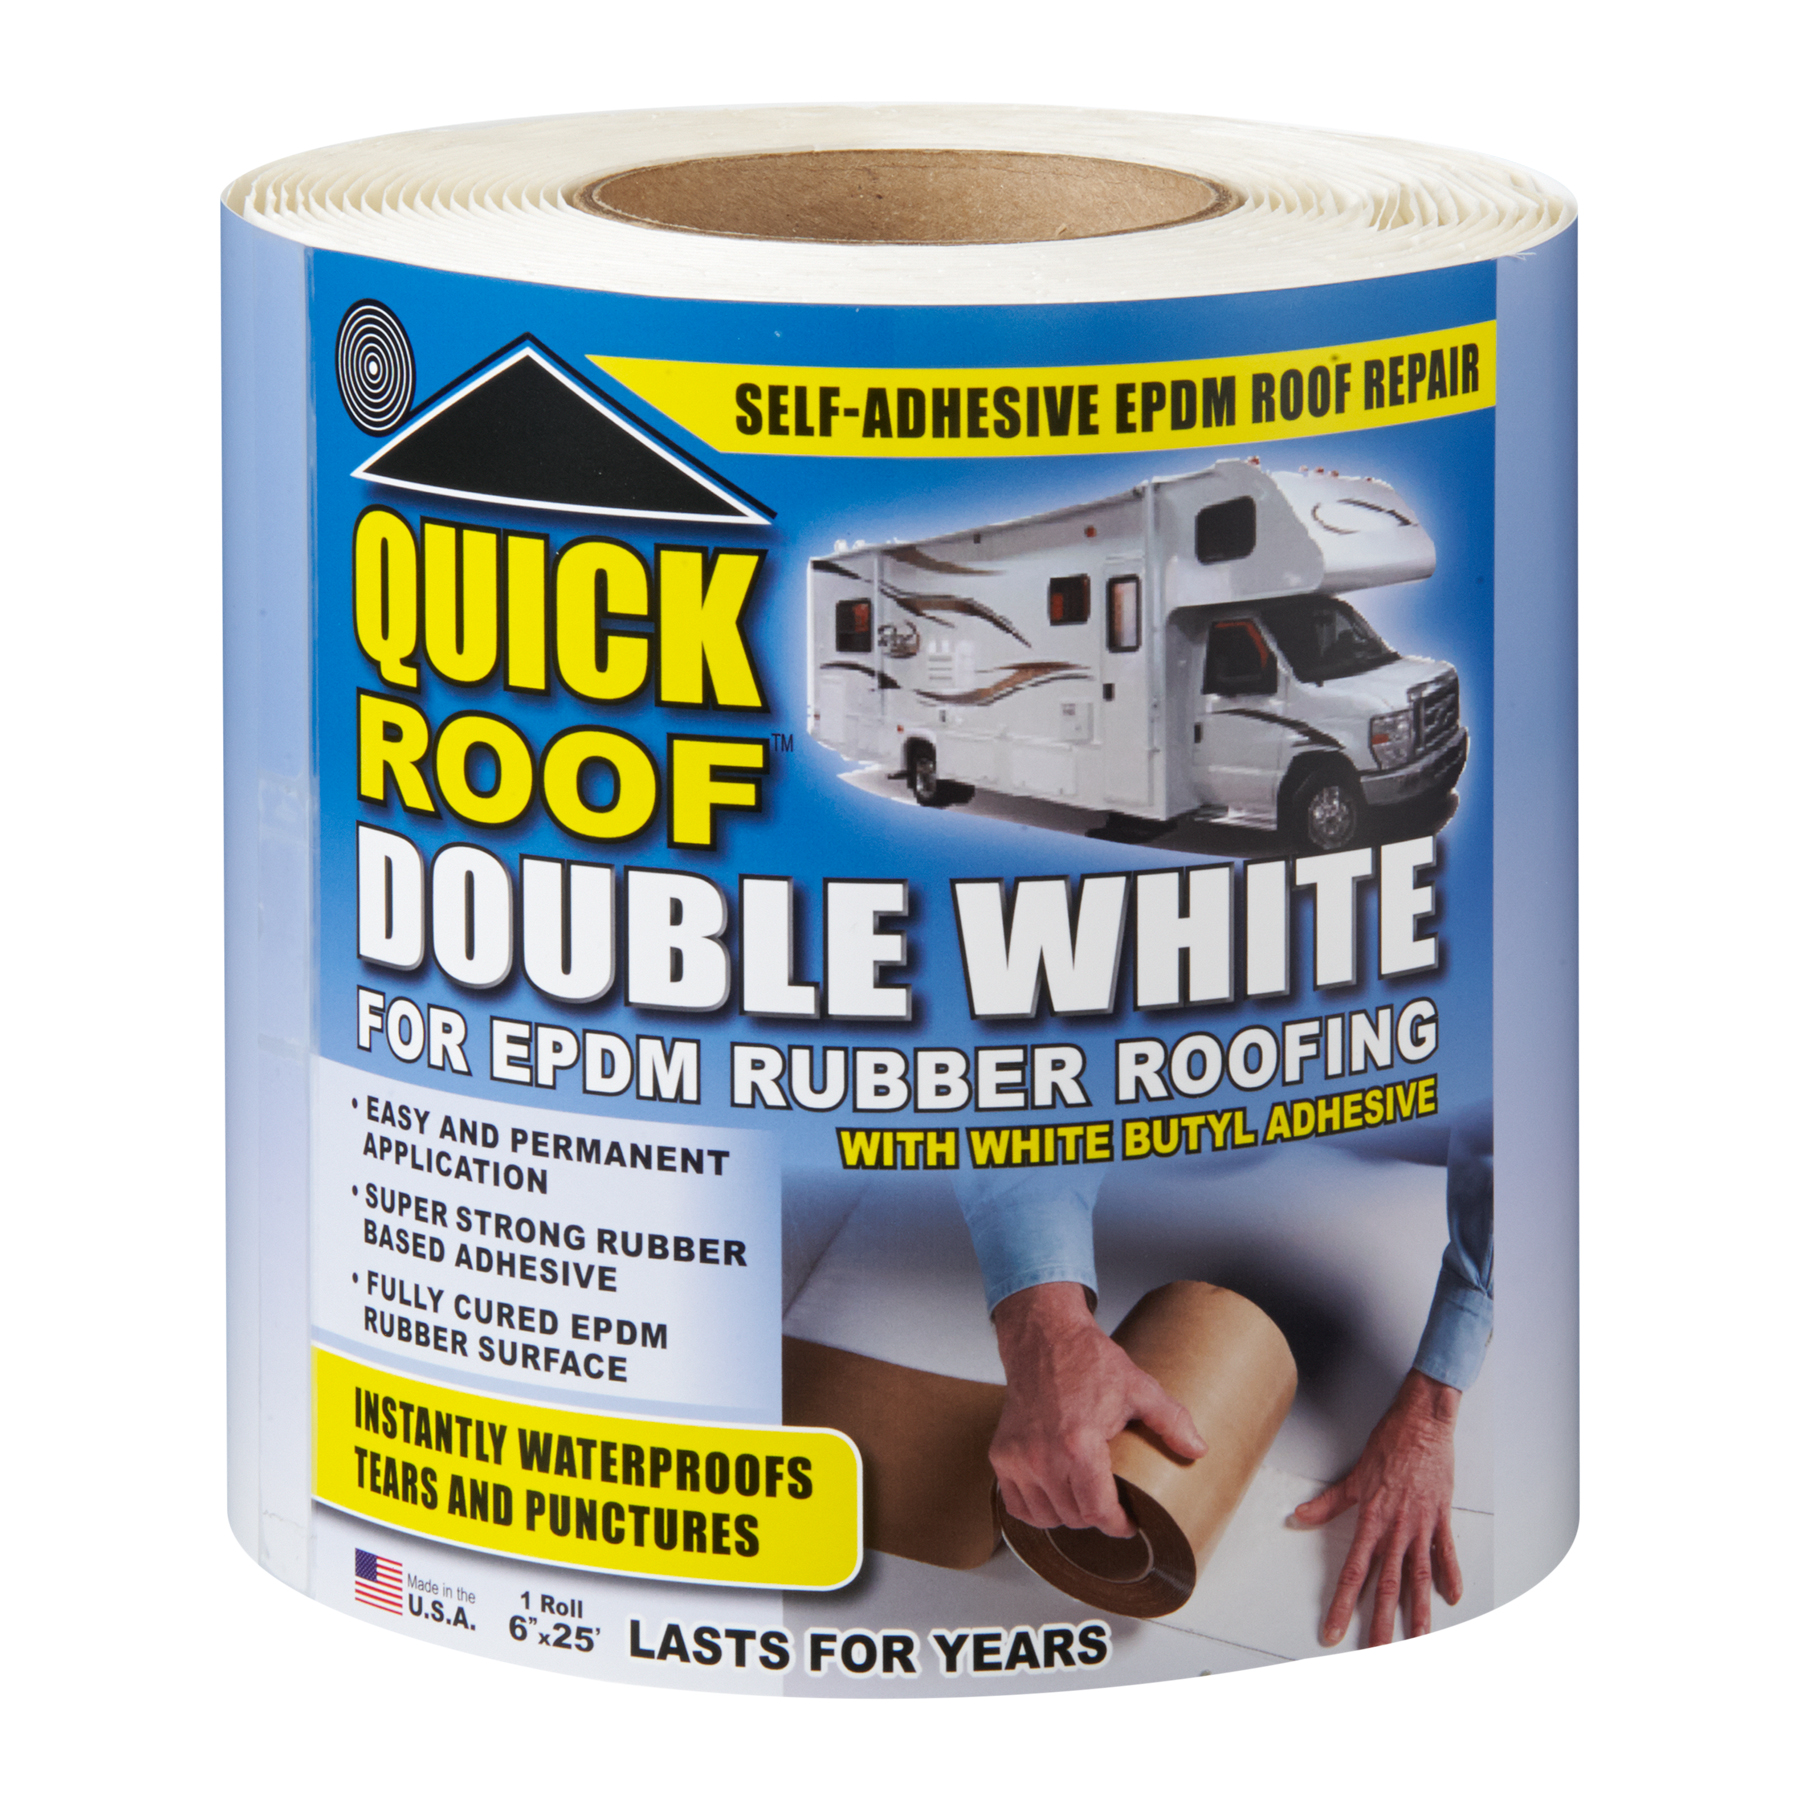
Tough Roof Covering Tape is a rubber roof covering tape that sticks to your surface area and is 100% water-proof. The tape has a textile mesh that coatings can be related to to develop a 100% water resistant membrane layer to your motor home roof. Use Challenging Repair layer over the top of the tape repair service job.
Be certain to cover the tape and the surface area around the tape up to 3 to 6 inches to make certain complete waterproofing When R.V.'s are produced they typically utilize silicone sealer which which sticks badly and eventually result in peeling and splitting creating damage or water to enter. While it does help safeguard your R.V.'s roofing and infiltrations from the aspects most recreational vehicle repairs come from using this sort of coating to seal your recreational vehicle roofing.
When Motor home roofing system fixing is finished around the whole R.V.'s roofing it's vital to make sure you make use of an extremely strong Motor home sealer that can hold up under all types of weather condition conditions! The R.V.'s roof covering can take a pounding over time which is why it's important to use the best Motor home sealer brand name! Prior to sealing and layer R.V.'s with Hard ROOF Motor home is crucial to tape off around the perimeter of your R.V.'s roofing so you do not get sealant on any type of various other component!
Repair Rv Roof Atwood, CA
If your recreational vehicle is brand-new or old then you must consider securing up any kind of leaks with Challenging Roof covering RV Covering before water damages makes it more pricey! We suggest you checkout our challenging ROOF RV PACKAGES and several of our tutorial videos that describe this more comprehensive. If your looking for the very best motor home Rubber Roof Covering or Sealer then you located it.
Recreational vehicle roof covering treatment is a crucial yet quickly featureless part of preserving your motor home. Routine maintenance can avoid deterioration, leakages and other troubles that can lead to extensive, costly repairs. It is necessary for motor home proprietors to recognize what they need to do to maintain their RV roof clean and secured.
These solutions can be costly and are typically not covered by your guarantee or insurance strategy. The type of material a motor home roof is made from depends on the version. While most traveling trailers have rubber roofs, clamshell trailers and motorhomes are most likely to have fiberglass roofs. Rubber RV roofing systems are made from a thin weatherproof membrane stretched over a wooden substratum.
Rv Fiberglass Roof Repair Atwood, CA
The white material is energy-efficient and can help your Recreational vehicle stay great. EPDM is one of the most durable Motor home roofing alternatives.
Fiberglass roof coverings are made from artificial materials and glass fibers. This shaped product is made into sheets or panels that can be tailored for the motor home. The benefits of fiberglass RV roof coverings include their lightweight layout and durability against corrosion and rot. Extended exposure to warmth can create thermal divides needing substantial repairs or a whole replacement to deal with.
While the material can last a long time, aluminum has some drawbacks to consider it needs to be secured, which can develop seam failing, and the material can conceal leakages. The roofing is the frontline against the components, making it vulnerable to damage. Lots of factors can cause troubles with a motor home roof covering, consisting of: Years when traveling can harm recreational vehicle roofing systems and create the product to break down.
Rv Rubber Roof Replacement Cost Atwood, CA
Sunlight, extreme temperature levels and rainfall can compromise the honesty of a recreational vehicle roof covering and trigger more damages. Gradually, sealers and caulk can damage down and allow water into the recreational vehicle. A small space can create a slow-moving leakage not noticeable from inside the recreational vehicle. Several of one of the most common troubles with motor home roofings consist of: If the roofing system material has openings or deterioration, or the roof accessories are not effectively sealed, these locations can create a leakage.
Relying on the state of the roof's rips and cracks, you might require to finish a spot repair or change the entire roof. Pooled water and color motivate the growth of mold and mildew and mold, which can be hard to clean up from a motor home roofing. Repair Rv Roof Atwood. Motor home roofs can oxidize over the years
RV roof coverings with inadequate water drainage have reduced locations that gather water from washing or rains. Destruction can create roof covering quality worries that protect against finishings from adhering to the roofing system.
Rv Roof Repair Fiberglass Atwood, CA
Doing motor home roof covering maintenance on a regular basis offers numerous benefits: Though regular upkeep needs you to spend money and time right into cleansing and fixing your roofing system, you will conserve even more in the long run. Maintenance helps your recreational vehicle last longer by fixing minor concerns prior to they come to be significant troubles. All kinds of weather can trigger damage on your roof covering.
Recreational vehicle roofing maintenance currently can make it easier to offer or trade in your RV in the future. You will need these devices and products: Roofing sealer shields the roof covering of your Motor home from harmful UV rays.

Motor homes that have an integrated ladder generally have a walkable roofing system. Additionally, be cautious not to step on the roofing cross competes and view for challenges when on the RV roof covering for your security.
Rv Rubber Roof Repair Atwood, CA
Cleaning your RV roofing system several times a year gets rid of the particles and prevents mold from holding and creating additional damage. Follow these actions to clean your motor home's roof: Sweep debris off the roofing, especially in the locations around the roofing system components. Make use of a pipe and water to wash off the roofing system.
You can utilize a cleansing product made for RVs or make your very own cleaner utilizing products you already carry hand (Repair Rv Roof Atwood). If the dirt and discolorations are established in, let the cleaner sit for a few mins. Scrub the roof with a brush, relocating round movements. If needed, include even more cleaner and scrub until the roofing is tidy.
Safety is likewise a problem given that waxes are slippery and can make walking on the roofing risky. A motor home fixing professional can apply finishings, make repair services and change sections of or the whole roofing, depending on what your recreational vehicle's roofing system needs. Whether your recreational vehicle's roofing system has concerns or is in leading problem, sealing and covering regularly are beneficial.
This item has a mild abrasive to remove the oxidation and can be rubbed till it radiates. A UV sealant or wax shields the RV roofing from UV rays, as direct exposure to the sun can make the roofing system product crack and leak. This sealer additionally makes the roof shiny and protects against black touches from forming on the wall surfaces.
Repair Rv Roof Atwood, CA
Some RV insurance coverage expect a roofing system replacement every 10 to 15 years. EternaBond tape is one approach for motor home roof covering fixing. This tape covers little rips and roofing system and wall separations alike, producing a water tight seal that stops water from getting involved in your RV. After reducing the tape to dimension, leave a big margin around the tear and push it into location, ensuring the item is laid flat versus the surface area.
This experience with camping expands to caring for a Motor home. KOA's handy staff are trained and well-informed in Recreational vehicle upkeep ideal methods, from the roof covering to the tires.
Lengthy story short, Progressive paid our entire original Price quote - IN FULL. The consumer was very distressed since they had Spring Break camping strategies, and we didn't know if we 'd be able to get the fixings done in time due to all the hold-ups.
Rv Roof Leak Repair Atwood, CA
But he called Progressive and should have been not-so-nice because he obtained the adjustor's supervisor entailed. When the boss man talked with the client, he was playing it up big. He claimed so as to get the repair work done as soon as possible so they could make their journey, we can get parts overnighted and they 'd cover it.
It was difficult throughout. Without entering into all of it, we did the roofing system our method - the correct way - and they really did not call for the adjustor ahead and evaluate it after tear-down. They enabled us to send images which, obviously, revealed the damage left after wrecking the initial EPDM.
Rv Trailer Rubber Roof Repair Atwood, CA
Provided all the problem Progressive had given us over this repair, we planned to hang onto the motor home until we were guaranteed payment of the final $1,542.75 they had actually kept for the roof repairs. When we contacted them they sent out a screenshot of the request for repayment to be issued, claiming they "wished it would certainly be adequate." Since we truly liked this consumer and he did have plans, we allowed the recreational vehicle leave the store on 3/30/18.
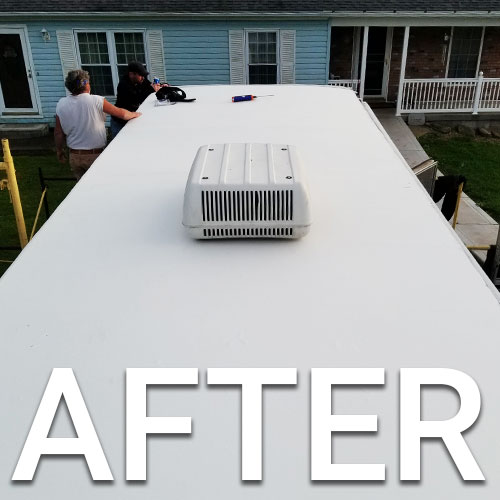
When we contacted them once again, they claimed they 'd quit payment and provide a brand-new one. We Ultimately got repayment 4/23/18. Photos of roof with brand-new substrate, and then finished.
RV roofing repair service is critically important. Overlooking it can compromise the integrity of your motor home travel trailer or motorhome. And since dealing with a tear in your rubber roof is so very easy, there's no factor to delay. Possibly you have actually found from experience that motor home rubber roofings and tree branches don't blend.
Due to its slow aging rate in the sunlight, makers usually provide a 10-12 year guarantee on their EPDM rubber roofings. A lot of rubber roofing systems will see a lifespan of 20+ years.
Roof Repair For Rv Atwood, CA
Long tale short, Progressive paid our whole initial Estimate - IN FULL. The client was extremely upset due to the fact that they had Springtime Damage camping strategies, and we didn't understand if we would certainly be able to obtain the fixings done in time due to all the delays.
However he called Progressive and has to have been not-so-nice since he obtained the adjustor's supervisor entailed. When the boss man spoke to the customer, he was playing it up huge. He said in order to obtain the repairs done as soon as possible so they could make their trip, we could order parts overnighted and they would certainly cover it.
Rv Roof Repair Service Near Me Atwood, CA
It was difficult to the end. Without going into all of it, we did the roofing system our means - the appropriate way - and they didn't need the adjustor to come and examine it after tear-down. They enabled us to send out images which, of training course, showed the damage left after destroying the initial EPDM.
Given all the difficulty Progressive had actually given us over this fixing, we meant to hang onto the recreational vehicle up until we were assured repayment of the last $1,542.75 they had actually kept for the roof fixings. When we contacted them they sent out a screenshot of the request for repayment to be provided, stating they "wished it would certainly be enough." Due to the fact that we truly liked this customer and he did have plans, we allowed the motor home leave the shop on 3/30/18.
Replace Rv Roof Atwood, CA
and really did not come ... and really did not come. When we contacted them again, they claimed they 'd quit settlement and issue a new one. We FINALLY obtained settlement 4/23/18. Obtained a one-line e-mail from the consumer yesterday: "How frustrating has this process been." He's purchasing brand-new insurance coverage. Images of roofing system with new substrate, and after that completed.
Motor home roof covering fixing is really vital. Disregarding it can endanger the integrity of your RV travel trailer or motorhome. And given that fixing a tear in your rubber roofing system is so easy, there's no factor to delay. Maybe you have actually found from experience that motor home rubber roof coverings and tree branches do not mix.
OCRV Center
Address: 23281 La Palma Ave Yorba Linda, CA 92887Phone: (714) 909-1444
Email: art@ocrvcenter.com
OCRV Center
It can endure temperatures from -50 F to +240 F without splitting. It can be strolled on, is adaptable, and has good resistance to abrasion. Due to its slow aging rate in the sunlight, producers frequently give a 10-12 year warranty on their EPDM rubber roofs. The majority of rubber roof coverings will see a life-span of 20+ years.
Rv Rubber Roof Replacement Atwood, CARv Fiberglass Roof Repair Atwood, CA
Motorhome Roof Replacement Atwood, CA
Rubber Roofing For Campers Atwood, CA
Rv Roof Leak Repair Atwood, CA
Rv Roof Repair Service Near Me Atwood, CA
Rv Roof Replacement Atwood, CA
Rv Rubber Roof Replacement Cost Atwood, CA
Rv Roof Replacement Atwood, CA
Rv Slide Out Roof Repair Atwood, CA
Rv Slide Out Roof Repair Atwood, CA
Repair Rv Roof Atwood, CA
Roof Repair For Rv Atwood, CA
Rv Roof Leak Repair Near Me Atwood, CA
Epdm Rv Roof Repair Atwood, CA
Rv Slide Out Roof Repair Atwood, CA
Rv Roof Repair Service Near Me Atwood, CA
Class C Rv Roof Repair Atwood, CA
Rv Roof Repair Fiberglass Atwood, CA
Rv Roof Maintenance Atwood, CA
Rv Slide Out Roof Repair Atwood, CA
Rv Rubber Roof Replacement Cost Atwood, CA
Rv Roof Leak Repair Near Me Atwood, CA
Replace Rv Roof Atwood, CA
Rv Roof Replacement Atwood, CA
Rv Roof Repair Fiberglass Atwood, CA
Rv Fiberglass Roof Repair Atwood, CA
Repair Rv Roof Leak Atwood, CA
Class C Rv Roof Repair Atwood, CA
Rv Roof Repair Atwood, CA
Epdm Rv Roof Repair Atwood, CA
Rubber Roofing For Rv Atwood, CA
Rv Roof Maintenance Atwood, CA
Class C Rv Roof Repair Atwood, CA
Rubber Roof For Rv Atwood, CA
Rubber Roof For Rv Atwood, CA
Rv Roof Repair Service Near Me Atwood, CA
Rv Rubber Roof Replacement Atwood, CA
Rv Trailer Rubber Roof Repair Atwood, CA
Rv Rubber Roof Repair Atwood, CA
Rv Roof Repair Service Near Me Atwood, CA
Rv Roof Leak Repair Atwood, CA
Rubber Roof For Rv Atwood, CA
Replace Rv Roof Atwood, CA
Rv Rubber Roof Replacement Cost Atwood, CA
Repair Rv Roof Leak Atwood, CA
Rv Rubber Roof Maintenance Atwood, CA
Rv Roof Repair Fiberglass Atwood, CA
Rv Slide Out Roof Repair Atwood, CA
Motorhome Roof Replacement Atwood, CA
Rubber Roofing For Rv Atwood, CA
Rv Roof Leak Repair Near Me Atwood, CA
Rv Roof Leak Repair Near Me Atwood, CA
Rv Rubber Roof Replacement Cost Atwood, CA
Replace Rv Roof Atwood, CA
Rv Rubber Roof Repair Atwood, CA
Rubber Roof Installation Atwood, CA
Rv Roof Leak Repair Near Me Atwood, CA
Rv Roof Leak Repair Atwood, CA
Epdm Rv Roof Repair Atwood, CA
Repair Rv Roof Leak Atwood, CA
Rv Trailer Roof Repair Atwood, CA
Rv Roof Replacement Atwood, CA
Rubber Roofing For Campers Atwood, CA
Rubber Roofing For Rv Atwood, CA
Rubber Roof For Rv Atwood, CA
Rv Rubber Roof Replacement Atwood, CA
Roof Repair For Rv Atwood, CA
Rv Roof Maintenance Atwood, CA
Rv Rubber Roof Replacement Atwood, CA
Rv Trailer Roof Repair Atwood, CA
Replace Rv Roof Atwood, CA
Rv Roof Maintenance Atwood, CA
Roof Repair For Rv Atwood, CA
Rv Roof Repair Atwood, CA
Rv Roof Repair Service Near Me Atwood, CA
Rv Roof Leak Repair Atwood, CA
Rv Rubber Roof Replacement Atwood, CA
Best Seo Services For Small Business Atwood, CA
In My Area Seo Solutions Atwood, CA
OCRV Center
Table of Contents
- – Rubber Roofing For Rv Atwood, CA
- – OCRV Center
- – Rv Rubber Roof Replacement Cost Atwood, CA
- – Repair Rv Roof Atwood, CA
- – Rv Fiberglass Roof Repair Atwood, CA
- – Rv Rubber Roof Replacement Cost Atwood, CA
- – Rv Roof Repair Fiberglass Atwood, CA
- – Rv Rubber Roof Repair Atwood, CA
- – Repair Rv Roof Atwood, CA
- – Rv Roof Leak Repair Atwood, CA
- – Rv Trailer Rubber Roof Repair Atwood, CA
- – Roof Repair For Rv Atwood, CA
- – Rv Roof Repair Service Near Me Atwood, CA
- – Replace Rv Roof Atwood, CA
- – OCRV Center
Latest Posts
Furnace Installation Sherman Oaks
Air Conditioning Repair Contractor South Pasadena
Air Conditioning Replacement Alhambra
More
Latest Posts
Furnace Installation Sherman Oaks
Air Conditioning Repair Contractor South Pasadena
Air Conditioning Replacement Alhambra