All Categories
Featured
Table of Contents
- – Fifth Wheel Repair Near Me Montclair, CA
- – OCRV Center
- – Cargo Trailer Repair Montclair, CA
- – Fifth Wheel Repair Near Me Montclair, CA
- – Fifth Wheel Service Montclair, CA
- – Trailer Window Replacement Montclair, CA
- – Travel Trailer Service Montclair, CA
- – Cargo Trailer Repair Montclair, CA
- – Travel Trailer Awning Replacement Montclair, CA
- – Horse Trailer Repair Near Me Montclair, CA
- – OCRV Center
Fifth Wheel Repair Near Me Montclair, CA
Being totally brand-new to all this, we have actually had a lot help from New Horizons proprietors, RVers in basic, the whole New Horizons team, and just random people throughout all the study that brought us to this point. We invested an entire week looking at our New Horizons and asked a million questions and did all things that every person tells you to do in the beginning.
High quality, value, and advancement are the core values that have been a component of the Gulf Stream Coach way of operating considering that it was established in Nappanee, Indiana, by Jim Shea and his kids. Today Gulf Stream Train is the sector's leading family-owned, family-operated RV maker, includes 22 brand names with over 140 different versions all gave you by the most dedicated and knowledgeable team of affiliates in the industry.
Using residential-style studs, spun fiberglass insulation, and light weight aluminum home siding for time-honored toughness and economy, in lengths from 20 ft. to 41 ft., our Key Line trailers are for dedicated RVers that recognize what they desire and acknowledge quality. Perfect for first-timers, value-oriented, and informal campers, integrating cost-effective pricing with sturdy yet light-weight go-anywhere building and construction.
Slide-out fixing, modification & positioning Base plate setup Brake controller setup & substitute Turn over sphere (gooseneck) systems Towing safety and security system assimilations Customized electrical and accessory upgrades From complex mechanical repair services to specialty aftermarket enhancements, we guarantee your recreational vehicle works precisely the means you require it to. Morris Motors & recreational vehicle uses specialist installment of the leading towing and hitch systems on the market.
Cargo Trailer Repair Montclair, CA
Call us or arrange your appointment online for quick, reputable RV solution backed by qualified professionals. We service all major recreational vehicle types, including travel trailers, fifth wheels, Class A, Class B, Class C motorhomes, plaything haulers, and Modern Buggy devices. If it has wheels and it campswe can service it.
You can arrange your service online or by calling our solution department. Roof maintenance is one of the most important solutions to prevent leakages and water damage. Our accredited specialists are trained to identify and repair complex electric and pipes problems, consisting of shorts, defective circuitry, water pumps, water heaters, and a lot more.
We are an, supplying professional setup for a large array of devices, towing elements, and upgrade packages. The majority of regular maintenance can be completed rapidly.
We always go for quick, exact turnaround times. Yes, we use both winterization and de-winterization solutions, ensuring your recreational vehicle stays shielded throughout Colorado's cold periods. Yes. We can often deal with prolonged service warranty service providers. Get in touch with us with your service warranty details, and we'll assist with coverage verification and case handling. Absolutely.
Fifth Wheel Repair Near Me Montclair, CA
At this time, we do all fixings and maintenance in our Falcon, CO solution center to make sure the finest diagnostics and repair standards. Bring your secrets, service warranty information (if relevant), and a thorough summary of any issues you're experiencing. The more information you give, the quicker we can diagnose and fix your RV.
From weekend getaways to fulltime RV living, these versions deliver the functions you need from residentialstyle cooking areas and relaxing bed rooms to enough storage for all your gear. Our car dealership is more than simply a place to get a motor home it's your fullservice recreational vehicle partner. Located in St. Louis, Missouri, we provide affordable rates, versatile financing, and an educated group prepared to guide you via every step of the acquiring procedure.
If you require assistance locating the excellent 5th wheel for you or if you have any type of inquiries concerning our towable Motor homes offer for sale, please and one of our pleasant and experienced team members will certainly more than happy to help you. At Byerly RV in St. Louis, Missouri, we're happy to be your goto location for 5th wheels available from several of one of the most relied on names in the motor home market including Alliance, Coachmen, Heritage Glen, and Woodland River.
Fifth Wheel Service Montclair, CA
Manufacturer-provided images, requirements and functions might be used as required. Stock shown may be just a partial listing of the entire inventory. Please contact us at 636-938-2000 for schedule as our stock modifications rapidly. All computed repayments are a price quote just and do not constitute a dedication that financing or a details rate of interest or term is available.
February 15, 2014March 25, 2013 With the intricacy of the modern-day RV comes a need for a reasonable quantity of upkeep to maintain it running efficiently and securely. Listed below you will certainly locate my individual Fifth Wheel motor home Maintenance checklist. No RVers list will coincide as there are many variables that go right into what needs done and when.

Several points can affect just how commonly points require to be examined. Having stated that right here is what works for me. Brakes every 6 months to one year draw the wheels and tidy and inspect the brake pads and drums. Replace parts if worn. Make sure the electrical brake electrical wiring is in good condition and not rubbing on anything.
Have a look at the suspension and axles before every trip and every couple of months inspect for appropriate torque setups on nuts and bolts. Prior to every journey examine torque setup on wheel lug nuts.
Trailer Window Replacement Montclair, CA
Inspect full charge voltage, should be 12.6 12.8 volts. Make sure there is no rust, loose adapters or overheated wires.
You'll likely locate them in the converter, refrigerator, stove hood, inverter, and so on. Lighting Every year, dissemble, tidy and examine light bulb connectors for any indication of overheated connectors. Change component if required.
Every few months vacuum out heating system ducts and inside furnace. Apply furnishings polish to wood cabinets every 6 months. Monthly check condition of all screws and repair anything coming loose. Oil door hinges and drawer hardware as required. Examine condition of blind hardware and replace worn strings as needed.
Travel Trailer Service Montclair, CA
Inspect all wall surface seams for decay in the sealant and around storage doors, pen lights and device panels - Montclair Travel Trailer Siding Repair. Clean Filon outer wall surface areas with moderate motor home soap and wax every six months. (FIlon is the name of my trailers outer wall surface material) Clean and treat slide rubber seals every six months
Quality, worth, and advancement are the core worths that have belonged of the Gulf Stream Coach method of doing service given that it was established in Nappanee, Indiana, by Jim Shea and his sons. Today Gulf Stream Coach is the sector's leading family-owned, family-operated RV supplier, includes 22 brand names with over 140 different designs all offered you by the most devoted and seasoned team of associates in the market.
Utilizing residential-style studs, spun fiberglass insulation, and light weight aluminum siding for classic sturdiness and economy, in lengths from 20 ft. to 41 ft., our Key Line trailers are for dedicated RVers who recognize what they desire and identify high quality. Perfect for first-timers, value-oriented, and informal campers, incorporating cost-effective rates with sturdy yet light-weight go-anywhere building and construction.
Cargo Trailer Repair Montclair, CA
Desire to update your Recreational vehicle? General Repairs Winterization All device replacement/repair Awning replacement/repair Load Wheel Bearings Brake Work We do insurance price quotes and repair work Propane Hitch work (Brake Control installation, Receiver installment, Fifth wheel/Gooseneck Installation) Please call our Solution Department at (618) 254-1180 to schedule your solution job.
To make a visit please call one of our three hassle-free cutting edge highway pleasant locations or submit the e-contact type. Home appliance Fixing (cooktop, heating system, refrigerator, A/C) Awning Repair Axle Fixing/ Upkeep Floor Repair Service Roof Covering Repair Service Aftermarket Add-on Installation Electric Drawback/ Brake Installation Plumbing Gas Body Shop/ Crash Facility And so much extra.
In Solution we have Certified Motor Home Specialists, Master Licensed Professionals, Certified Solution Writers, and Qualified Solution Managers, one of which has actually been with Little Dealership considering that 1975. Little Supplier Little Costs RV is a recognized member of the Better Organization Bureau with an A+ rating, the greatest available.
Whatsoever American Towing, we have actually taken fantastic satisfaction in our capacity to offer Dallas, Denton County, and surrounding locations since 2016. Our adage, "When A Consumer Calls, We remain in Path," mirrors our commitment to prompt and reliable service. We specialize in fifth-wheel and motor home towing, offering satisfaction whether you're handling a breakdown or relocating your RV. We understand that Motor homes and fifth-wheel trailers are your home far from home, and we manage every towing work with care.
Travel Trailer Awning Replacement Montclair, CA
As a group of experts, you can relax very easy knowing that when you call us, you'll be treated with miraculous care. Whatever you drive, you can depend on a work well done by our safety-conscious group without any hassle. From your fifth wheel to your Course C motor home or miniature recreational vehicle, All American Towing is your professional resource for all your motor home lugging demands.
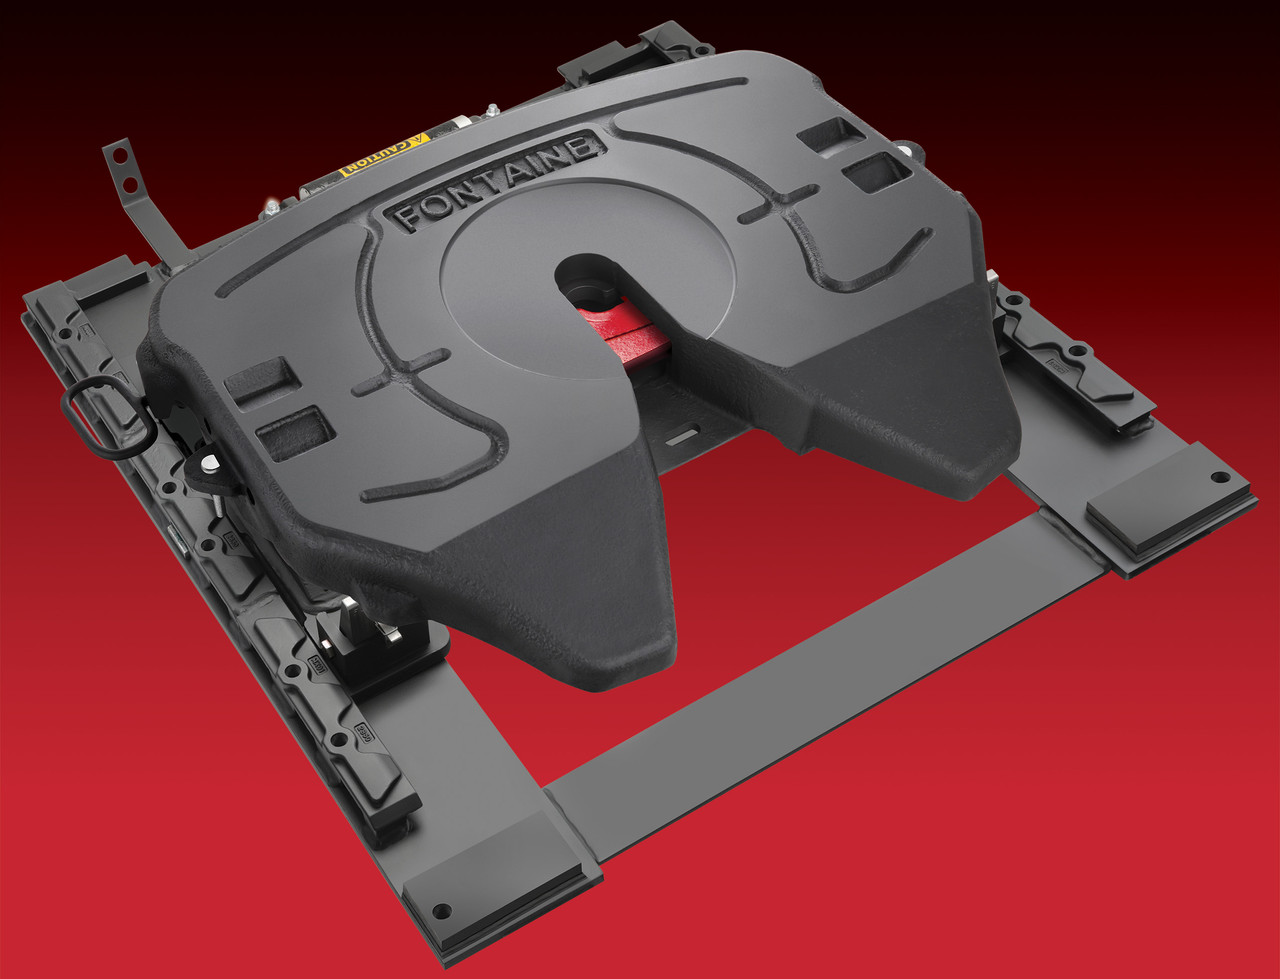
Schwab's RV World in Leduc is your Alberta 5th wheel dealership. Listed below, you'll discover some useful suggestions for maintaining your fifth-wheel hitch so that it's constantly working properly. You'll desire to eliminate as much dirty grease and particles from the drawback as possible. This will certainly assist you to see it better so that you can evaluate it and keep it.
Degreasing and examining your fifth wheel every period will help to make certain it remains in excellent functioning order. Some people may try to include grease without cleaning the old grease away, but the old oil can choose up contaminants that cause it to ice up in cool temperatures, stopping the lock from operating properly.
The lock jaw, throat and pivot points are the most likely places where damages might occur. Elements might likewise have diminished and welds may break. Examination parts that relocate to see if they have their full series of activity still. Deterioration and rust can embed in and cause components to malfunction and become rigid, and this is harmful since the combining of your 5th wheel is dependent upon timing to ensure that the trailer and drawback can secure right into location.
Horse Trailer Repair Near Me Montclair, CA
The linings should be replaced around every 500,000 kilometres for standard use. Examine the brace liner thickness every single time you preserve your fifth-wheel hitch and replace any worn or broken linings. You'll require to re-grease all the moving components on your fifth wheel to make certain they can move correctly.
Lubricate the kingpin lock itself and apply a light oil to moving parts. If your fifth wheel slides, you may desire to oil the slide path on the base plate. Once you have actually repaired every little thing, you'll intend to check the authority and see to it that it rests appropriately which the lock works.
OCRV Center
Address: 23281 La Palma Ave Yorba Linda, CA 92887Phone: (714) 909-1444
Email: art@ocrvcenter.com
OCRV Center
, maintenance, and repair work. Listed below, we'll discuss what the most usual 5th wheel fixing is and offer you some fast and simple tips for exactly how to fix it.
Horse Trailer Repairs Montclair, CATravel Trailer Service Montclair, CA
Trailer Restoration Montclair, CA
Travel Trailer Repairs Montclair, CA
Travel Trailer Awning Replacement Montclair, CA
Travel Trailer Repairs Montclair, CA
Travel Trailer Floor Repair Montclair, CA
Travel Trailer Window Replacement Montclair, CA
Rv Trailer Repair Near Me Montclair, CA
Camper Trailer Service Montclair, CA
Cargo Trailer Repair Montclair, CA
Travel Trailer Awning Replacement Montclair, CA
Travel Trailer Furniture Montclair, CA
Travel Trailer Siding Repair Montclair, CA
Trailer Awning Replacement Montclair, CA
Travel Trailer Ceiling Repair Montclair, CA
Fifth Wheel Service Montclair, CA
Rv Trailer Repair Near Me Montclair, CA
Trailer Restoration Montclair, CA
Travel Trailer Awning Replacement Montclair, CA
Rv Trailer Repair Shops Near Me Montclair, CA
Rv Travel Trailer Repair Near Me Montclair, CA
Horse Trailer Repairs Montclair, CA
Travel Trailer Repairs Montclair, CA
Rv Trailer Repair Shops Near Me Montclair, CA
Trailer Roof Repair Montclair, CA
Travel Trailer Repairs Montclair, CA
Travel Trailer Siding Repair Montclair, CA
Camping Trailer Repair Near Me Montclair, CA
Rv Trailer Service Near Me Montclair, CA
Travel Trailer Window Replacement Montclair, CA
Trailer Window Replacement Montclair, CA
Travel Trailer Window Replacement Montclair, CA
Horse Trailer Repair Near Me Montclair, CA
Rv Trailer Repair Shops Near Me Montclair, CA
Rv Trailer Service Near Me Montclair, CA
Camping Trailer Repair Near Me Montclair, CA
Rv Trailer Service Near Me Montclair, CA
Travel Trailer Floor Repair Montclair, CA
Fifth Wheel Service Montclair, CA
Rv Trailer Service Near Me Montclair, CA
Travel Trailer Furniture Montclair, CA
Rv Travel Trailer Repair Near Me Montclair, CA
Fifth Wheel Repair Near Me Montclair, CA
Trailer Restoration Montclair, CA
Trailer Floor Repair Montclair, CA
Trailer Roof Repair Montclair, CA
Travel Trailer Ceiling Repair Montclair, CA
Travel Trailer Service Montclair, CA
Camper Floor Repair Near Me Montclair, CA
Trailer Windows Replacement Montclair, CA
Travel Trailer Replacement Windows Montclair, CA
5th Wheel Repair Near Me Montclair, CA
Camping Trailer Repair Near Me Montclair, CA
Travel Trailer Roof Replacement Montclair, CA
Trailer Floor Repair Montclair, CA
Trailer Windows Replacement Montclair, CA
Travel Trailer Service Montclair, CA
Camper Trailer Service Montclair, CA
Camper Trailer Service Montclair, CA
Travel Trailer Floor Repair Montclair, CA
Travel Trailer Floor Repair Montclair, CA
Travel Trailer Replacement Windows Montclair, CA
Camping Trailer Repair Near Me Montclair, CA
Travel Trailer Siding Repair Montclair, CA
Camper Floor Repair Near Me Montclair, CA
Travel Trailer Service Montclair, CA
Rv Trailer Repair Shops Near Me Montclair, CA
5th Wheel Repair Near Me Montclair, CA
Fifth Wheel Repair Near Me Montclair, CA
Travel Trailer Repairs Montclair, CA
Travel Trailer Window Replacement Montclair, CA
Trailer Roof Repair Montclair, CA
Trailer Awning Replacement Montclair, CA
Trailer Roof Repair Montclair, CA
Rv Trailer Repair Near Me Montclair, CA
Travel Trailer Siding Repair Montclair, CA
Travel Trailer Window Replacement Montclair, CA
In My Area Seo Management Montclair, CA
Around Me Seo Packages Montclair, CA
OCRV Center
Table of Contents
- – Fifth Wheel Repair Near Me Montclair, CA
- – OCRV Center
- – Cargo Trailer Repair Montclair, CA
- – Fifth Wheel Repair Near Me Montclair, CA
- – Fifth Wheel Service Montclair, CA
- – Trailer Window Replacement Montclair, CA
- – Travel Trailer Service Montclair, CA
- – Cargo Trailer Repair Montclair, CA
- – Travel Trailer Awning Replacement Montclair, CA
- – Horse Trailer Repair Near Me Montclair, CA
- – OCRV Center
Latest Posts
Orange County Handicap Van Lift Repair
West Covina Wheelchair Accessible Van Repair
Resealing Rv Roof Riverside
More
Latest Posts
Orange County Handicap Van Lift Repair
West Covina Wheelchair Accessible Van Repair
Resealing Rv Roof Riverside